

From Backend to Full Stack: Building React Frontend with Authentication (Part 2)
Connect your Express backend to React frontend. Learn Axios setup, CORS handling, Zustand state management, and build a complete authentication system.
Welcome back! In Part 1, we built a solid Express backend with JWT authentication, MongoDB integration, and secure password hashing. Now it's time to bring it to life with a React frontend.
By the end of this tutorial, you'll have a complete full-stack application where users can register. We'll cover API integration, state management, CORS handling, and build a beautiful authentication interface.
This is where the magic happens – when backend and frontend work together seamlessly.
Prerequisites: React Foundation
This guide assumes you understand React fundamentals. If you need a refresher, check out my previous posts:
- React Essentials: From Components to Routing
- React State Management: From Context API to Zustand and Redux
We'll assume you have a basic React project set up with routing configured. If not, create one with:
npm create vite@latest frontend -- --template react
cd frontend
npm install react-router-dom
npm run dev
Now let's bridge the gap between your backend and frontend.
API Communication: Fetch vs Axios
Before connecting to our backend, we need to choose how to make HTTP requests. You have two main options:
The Fetch API (Built-in)
// Using Fetch API
const response = await fetch('http://localhost:5001/api/v1/auth/signup', {
  method: 'POST',
  headers: {
    'Content-Type': 'application/json',
  },
  credentials: 'include', // Include cookies
  body: JSON.stringify({
    name: 'John Doe',
    username: 'johndoe',
    email: 'john@example.com',
    password: 'password123',
  }),
});

const data = await response.json();

if (!response.ok) {
  throw new Error(data.message || 'Request failed');
}
Axios (Third-party Library)
// Using Axios
const response = await axios.post(
  '/auth/signup',
  {
    name: 'John Doe',
    username: 'johndoe',
    email: 'john@example.com',
    password: 'password123',
  },
  {
    withCredentials: true, // Include cookies
  },
);

const data = response.data;
Why Choose Axios?
While Fetch API is built into modern browsers, Axios offers several advantages:
- Automatic JSON parsing: No need to call
.json()manually - Request/Response interceptors: Perfect for adding auth tokens or handling errors globally
- Better error handling: Throws errors for 4xx and 5xx status codes automatically
- Request timeout support: Built-in timeout configuration
- Broader browser support: Works in older browsers
- Cleaner syntax: Less boilerplate code
For production applications, Axios's powerful features make it the preferred choice.
Setting Up Axios Instance
Let's install Axios and create a configured instance:
npm install axiosCreate a centralized Axios configuration:
// src/lib/axios.js
import axios from 'axios';

// Create axios instance with base configuration
export const axiosInstance = axios.create({
  baseURL:
    import.meta.env.MODE === 'development'
      ? 'http://localhost:5001/api/v1' // Development server
      : '/api/v1', // Production (same domain)
  withCredentials: true, // Include cookies in requests
  timeout: 10000, // 10 second timeout
});
Understanding the Configuration
Dynamic Base URL: In development, we connect to localhost:5001, but in production, the frontend and backend often share the same domain, so we use relative URLs.
withCredentials: This is crucial! It tells Axios to include cookies (like our JWT token) in every request. Without this, authentication won't work.
Example Usage
Now you can make requests easily:
// POST request example
try {
  const response = await axiosInstance.post('/auth/signup', userData);
  console.log('User created:', response.data);
} catch (error) {
  console.error('Signup failed:', error.response?.data?.message);
}

// GET request example
try {
  const response = await axiosInstance.get('/auth/check');
  console.log('Current user:', response.data);
} catch (error) {
  console.error('Auth check failed:', error.message);
}
Understanding and Fixing CORS
Now that we have Axios configured, let's try making a request. You'll likely encounter this error:
Access to XMLHttpRequest at 'http://localhost:5001/api/v1/auth/signup'
from origin 'http://localhost:5173' has been blocked by CORS policy
What is CORS?
CORS (Cross-Origin Resource Sharing) is a security feature implemented by web browsers. It prevents web pages from making requests to a different domain, port, or protocol than the one serving the web page.
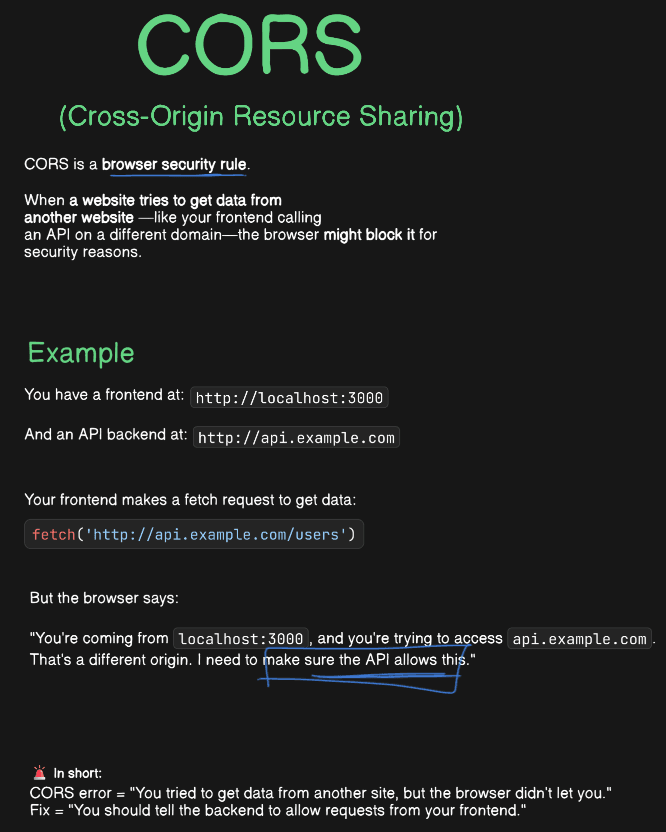
Why does CORS exist? Without CORS, any website could make requests to your bank's API using your cookies, potentially stealing sensitive data. CORS ensures only trusted origins can access your APIs.
Fixing CORS in our Backend
Add CORS configuration to your Express server:
# In your backend directory
npm install cors
Update your server.js:
// server.js
import cookieParser from 'cookie-parser';
import cors from 'cors';
import dotenv from 'dotenv';
import express from 'express';
import helmet from 'helmet';

import { connectDB } from './config/database.js';
import authRoutes from './routes/auth.routes.js';

dotenv.config();

const app = express();
const PORT = process.env.PORT || 5001;

// CORS configuration
if (process.env.NODE_ENV !== 'production') {
  app.use(
    cors({
      origin: 'http://localhost:5173', // Your React app URL
      credentials: true, // Allow cookies to be sent
      methods: ['GET', 'POST', 'PUT', 'DELETE', 'OPTIONS'],
      allowedHeaders: ['Content-Type', 'Authorization'],
    }),
  );
}

// Other middleware
app.use(helmet());
app.use(express.json());
app.use(cookieParser());

// Routes
app.use('/api/v1/auth', authRoutes);

app.listen(PORT, () => {
  connectDB();
  console.log(`Server is running on PORT ${PORT}`);
});
Production CORS Considerations
In production, your React app and Express server typically run on the same domain, eliminating CORS issues. For example:
- Frontend:
https://yourapp.com - Backend:
https://yourapp.com/api/v1
If they're on different domains, configure CORS for your production URLs:
// Production CORS example
app.use(
  cors({
    origin: ['https://yourapp.com', 'https://www.yourapp.com'],
    credentials: true,
  }),
);
Now your frontend can successfully communicate with your backend!
State Management with Zustand
Managing user authentication state across your entire React app can be challenging. You need to:
- Store current user information
- Track loading states (signing up, logging in)
- Handle authentication checks
- Share this data across all components
Without proper state management, you'd face prop drilling – passing data through multiple component levels even when intermediate components don't need it.
Why Zustand Over Other Solutions?
Context API: Built-in but can cause performance issues with frequent updates
Redux: Powerful but complex setup and boilerplate
Zustand: Simple, lightweight, and powerful
Zustand provides the simplicity of Context API with the power of Redux, without the complexity.
Setting Up Zustand
npm install zustandCreate your authentication store:
// src/store/useAuthStore.js
import { create } from "zustand";
import { axiosInstance } from "../lib/axios.js";

export const useAuthStore = create((set, get) => ({
  // State
  authUser: null, // Current authenticated user
  isSigningUp: false, // Loading state for signup
  isLoggingIn: false, // Loading state for login
  isCheckingAuth: true, // Loading state for initial auth check

  // Actions
  checkAuth: async () => {
    try {
      const res = await axiosInstance.get("/auth/check");
      set({ authUser: res.data.user });
    } catch (error) {
      console.log("Error in checkAuth:", error);
      set({ authUser: null });
    } finally {
      set({ isCheckingAuth: false });
    }
  },

  signup: async (data) => {
    set({ isSigningUp: true });
    try {
      const res = await axiosInstance.post("/auth/signup", data);
      set({ authUser: res.data.user });

      return {
        success: true,
        data: res.data,
        message: res.data.message || "User registered successfully"
      };
    } catch (error) {
      let errorMessage = "Signup failed";

      // Handle different error scenarios matching your backend
      if (error.response?.data?.message) {
        errorMessage = error.response.data.message;
      } else if (error.response?.data?.missingFields) {
        errorMessage = `Missing fields: ${error.response.data.missingFields.join(", ")}`;
      } else if (error.message) {
        errorMessage = error.message;
      }

      console.error("Signup error:", errorMessage);
      return { success: false, error: errorMessage };
    } finally {
      set({ isSigningUp: false });
    }
  },
  login: async (data) => {// try implementing},
  logout: async () => {// try implementing},
}));
Understanding Zustand Structure
create(): Creates a store with state and actions
set(): Updates the store state
get(): Accesses current store state (useful for accessing state within actions)
The beauty of Zustand is its simplicity – no providers, no complex setup, just import and use!
Using the Store in Components
// In any component
import { useAuthStore } from '../store/useAuthStore';

function SomeComponent() {
  const { authUser, isSigningUp, signup } = useAuthStore();

  if (authUser) {
    return <p>Welcome, {authUser.name}!</p>;
  }

  return <LoginForm />;
}
Building the Signup Component
Now let's create a functional signup form. I'll focus on the core functionality rather than complex styling:
// src/components/SignupForm.jsx
import React, { useState } from 'react';
import { useNavigate } from 'react-router-dom';

import { useAuthStore } from '../store/useAuthStore.js';

const SignupForm = () => {
  const navigate = useNavigate();
  const [formData, setFormData] = useState({
    name: '',
    username: '',
    email: '',
    password: '',
  });
  const [error, setError] = useState('');

  const { signup, isSigningUp } = useAuthStore();

  const handleInputChange = (e) => {
    const { name, value } = e.target;
    setFormData((prev) => ({ ...prev, [name]: value }));
    if (error) setError(''); // Clear error when user starts typing
  };

  const handleSubmit = async (e) => {
    e.preventDefault();
    setError('');

    // Basic validation matching backend requirements
    if (
      !formData.name ||
      !formData.username ||
      !formData.email ||
      !formData.password
    ) {
      setError('All fields are required');
      return;
    }

    // Email format validation (matching backend)
    const emailRegex = /^[^\s@]+@[^\s@]+\.[^\s@]+$/;
    if (!emailRegex.test(formData.email)) {
      setError('Invalid email format');
      return;
    }

    // Password validation (matching backend)
    if (formData.password.length < 6) {
      setError('Password must be at least 6 characters');
      return;
    }

    // Submit to backend - data structure matches backend controller
    const result = await signup({
      name: formData.name.trim(),
      username: formData.username.trim().toLowerCase(),
      email: formData.email.trim().toLowerCase(),
      password: formData.password,
    });

    if (result.success) {
      // User is automatically stored in Zustand store by the signup action
      navigate('/dashboard');
    } else {
      setError(result.error);
    }
  };

  return (
    <div className="max-w-md mx-auto mt-8 p-6 bg-white rounded-lg shadow-md">
      <h2 className="text-2xl font-bold text-center mb-6">Create Account</h2>

      {error && (
        <div className="mb-4 p-3 bg-red-100 border border-red-400 text-red-700 rounded">
          {error}
        </div>
      )}

      <form onSubmit={handleSubmit} className="space-y-4">
        <div>
          <label
            htmlFor="name"
            className="block text-sm font-medium text-gray-700"
          >
            Full Name
          </label>
          <input
            type="text"
            name="name"
            id="name"
            value={formData.name}
            onChange={handleInputChange}
            disabled={isSigningUp}
            placeholder="Enter your full name"
            className="mt-1 block w-full px-3 py-2 border border-gray-300 rounded-md shadow-sm focus:outline-none focus:ring-blue-500 focus:border-blue-500 disabled:opacity-50"
          />
        </div>

        <div>
          <label
            htmlFor="username"
            className="block text-sm font-medium text-gray-700"
          >
            Username
          </label>
          <input
            type="text"
            name="username"
            id="username"
            value={formData.username}
            onChange={handleInputChange}
            disabled={isSigningUp}
            placeholder="Choose a username"
            className="mt-1 block w-full px-3 py-2 border border-gray-300 rounded-md shadow-sm focus:outline-none focus:ring-blue-500 focus:border-blue-500 disabled:opacity-50"
          />
        </div>

        <div>
          <label
            htmlFor="email"
            className="block text-sm font-medium text-gray-700"
          >
            Email Address
          </label>
          <input
            type="email"
            name="email"
            id="email"
            value={formData.email}
            onChange={handleInputChange}
            disabled={isSigningUp}
            placeholder="Enter your email"
            className="mt-1 block w-full px-3 py-2 border border-gray-300 rounded-md shadow-sm focus:outline-none focus:ring-blue-500 focus:border-blue-500 disabled:opacity-50"
          />
        </div>

        <div>
          <label
            htmlFor="password"
            className="block text-sm font-medium text-gray-700"
          >
            Password
          </label>
          <input
            type="password"
            name="password"
            id="password"
            value={formData.password}
            onChange={handleInputChange}
            disabled={isSigningUp}
            placeholder="Create a password (min 6 characters)"
            className="mt-1 block w-full px-3 py-2 border border-gray-300 rounded-md shadow-sm focus:outline-none focus:ring-blue-500 focus:border-blue-500 disabled:opacity-50"
          />
        </div>

        <button
          type="submit"
          disabled={isSigningUp}
          className="w-full flex justify-center py-2 px-4 border border-transparent rounded-md shadow-sm text-sm font-medium text-white bg-blue-600 hover:bg-blue-700 focus:outline-none focus:ring-2 focus:ring-offset-2 focus:ring-blue-500 disabled:opacity-50 disabled:cursor-not-allowed"
        >
          {isSigningUp ? 'Creating Account...' : 'Create Account'}
        </button>
      </form>

      <p className="mt-4 text-center text-sm text-gray-600">
        Already have an account?{' '}
        <button
          onClick={() => navigate('/login')}
          className="font-medium text-blue-600 hover:text-blue-500"
        >
          Sign in
        </button>
      </p>
    </div>
  );
};

export default SignupForm;
Testing the Complete Flow
Let's test our complete authentication system:
- Start your backend server (from Part 1):
cd backend
npm run dev- Start your React development server:
cd frontend
npm run dev- Test the signup flow:
- Open
http://localhost:5173 - Fill out the signup form
- Check the browser's Network tab to see the API request
- Verify the user is created in your MongoDB database
- Check that cookies are set correctly
- Open
What We've Accomplished
You've successfully built a complete full-stack authentication system for signup! Here's what you now have:
Backend (Part 1):
- Express server with proper middleware
- JWT-based authentication
- Secure password hashing with bcrypt
- MongoDB integration with Mongoose
- RESTful API endpoints
- Error handling and validation
Frontend (Part 2):
- React components with modern hooks
- Axios configuration for API communication
- CORS setup for development
- Zustand state management
- Form validation and error handling
Challenge: Implement Login Functionality
Now it's your turn! Using the signup functionality as a reference, try implementing the login feature:
- Add login action to your Zustand store
- Create a login form component (simpler than signup - only username and password)
- Update your backend to include the login controller from Part 1
- Test the complete flow from registration to login
This is the best way to solidify your understanding – by building it yourself!
Next Steps: Beyond Authentication
With authentication complete, you can now build any feature on top of this foundation:
Immediate Enhancements:
- Protected routes using React Router
- User profile management
- Password reset functionality
- Email verification
Feature Ideas:
- Notes App: Create, edit, delete personal notes
- Task Manager: Todo lists with categories and deadlines
- Blog Platform: Write and publish articles
- Social Features: Follow users, like posts, comments
The authentication system you've built is production-ready and can scale to support thousands of users.
Key Takeaways
Building full-stack applications becomes much easier once you understand these core concepts:
API Communication: Axios provides a robust, feature-rich way to connect frontend and backend
State Management: Zustand simplifies global state without the complexity of Redux
Security: CORS, JWT tokens, and secure cookies protect your application
User Experience: Loading states, error handling, and validation create professional applications
The MERN stack gives you everything needed to build modern, scalable web applications. From here, the possibilities are endless!


