

Building Your First MERN Stack Backend: From Zero to Authentication (Part 1)
Learn to build a complete Node.js backend with Express, MongoDB, and authentication. Master servers, APIs, routing, and middleware with practical examples.
Building web applications can feel overwhelming when you're starting out. I remember staring at countless tutorials, wondering how all these pieces fit together. After building couple of MERN applications, I've learned that understanding the backend is the foundation of full-stack development.
In this two-part series, we'll build a complete authentication system from scratch. By the end of Part 1, you'll have a fully functional backend with user registration, JWT authentication, and proper security practices. Part 2 will cover connecting this backend to a React frontend.
Let's start with the fundamentals and build something real together.
What Exactly Is a Server?
A server is simply a program that listens for requests and sends back responses. Think of it like a restaurant kitchen – customers (clients) place orders (requests), and the kitchen (server) prepares and delivers the food (responses).
In web development, when you visit a website, your browser sends a request to a server somewhere in the world. That server processes your request and sends back the HTML, CSS, and JavaScript that makes up the webpage.
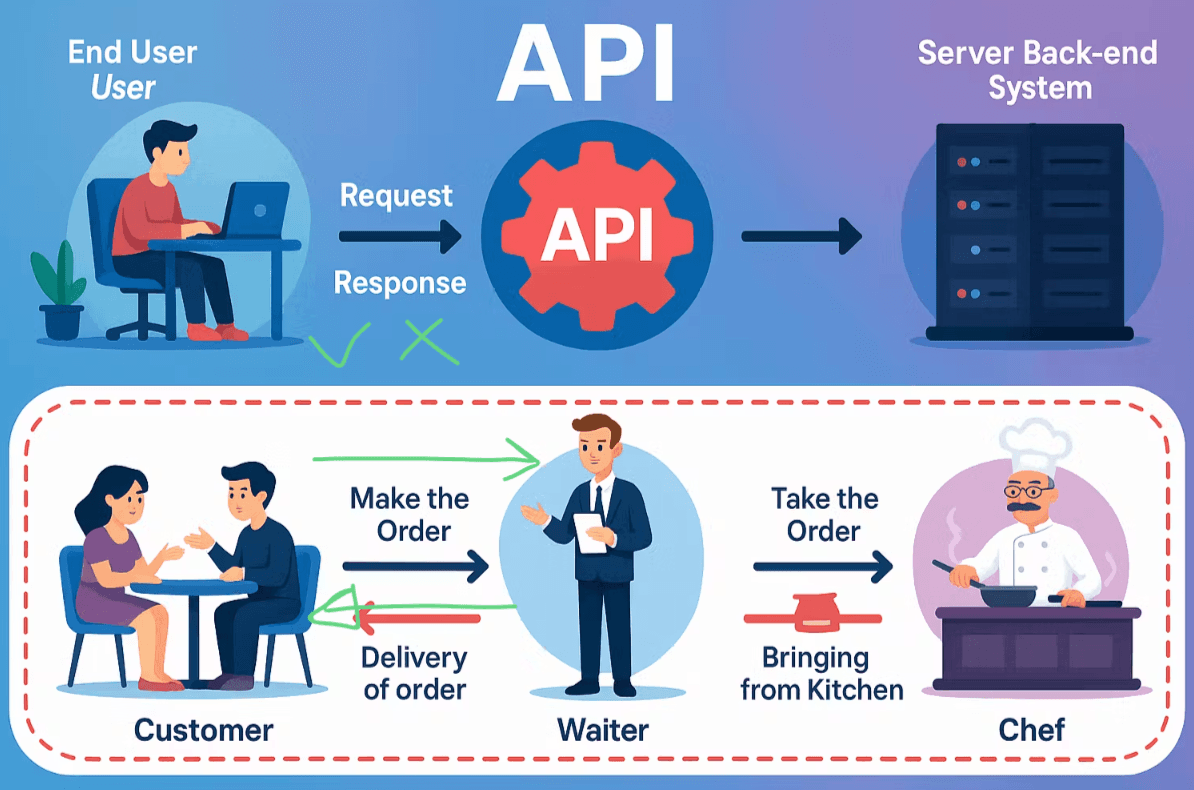
For our MERN stack application, we'll create a server using Node.js that can handle user authentication, store data, and provide APIs for our frontend to consume.
Setting Up Express: Your Server Framework
Node.js gives us the ability to run JavaScript on the server, but writing a server from scratch would require hundreds of lines of code. This is where Express comes in – it's a minimal framework that simplifies server creation.
Why Express?
Express handles the heavy lifting of HTTP server management, routing, and middleware integration. While you could use alternatives like Hono (a lightweight framework) or Fastify (performance-focused), Express remains the industry standard with the largest ecosystem and community support.
Here's how you could create a basic server without Express:
// Without Express (more complex)
const http = require("http");
const url = require("url");

const server = http.createServer((req, res) => {
  const parsedUrl = url.parse(req.url, true);

  if (parsedUrl.pathname === "/api/users" && req.method === "GET") {
    res.writeHead(200, { "Content-Type": "application/json" });
    res.end(JSON.stringify({ message: "Users endpoint" }));
  } else {
    res.writeHead(404, { "Content-Type": "text/plain" });
    res.end("Not Found");
  }
});

server.listen(3000);
Compare that to Express:
// With Express (much simpler)
import express from "express";

const app = express();

app.get("/api/users", (req, res) => {
  res.json({ message: "Users endpoint" });
});

app.listen(3000, () => {
  console.log("Server running on port 3000");
});
Backend Folder Structure
A well-organized backend follows a predictable structure. Here's the folder organization we'll use:
backend/
├── config/
│   └── database.js          # Database connection
├── controllers/
│   └── auth.controller.js   # Business logic for authentication
├── middleware/
│   └── auth.middleware.js   # Authentication middleware
├── models/
│   └── user.model.js        # Database models/schemas
├── routes/
│   └── auth.routes.js       # Route definitions
├── .env                     # Environment variables
├── .gitignore
├── package.json
└── server.js                # Main server file
This structure separates concerns and makes your codebase maintainable as it grows.
Understanding APIs and RESTful Design
An API (Application Programming Interface) is a contract that defines how different software components communicate. In web development, we typically build REST APIs that use HTTP methods to perform operations.
RESTful API Fundamentals
REST (Representational State Transfer) uses standard HTTP methods for different operations:
- GET: Retrieve data (like getting user profile)
- POST: Create new data (like registering a user)
- PUT: Update entire resource (like updating complete user profile)
- PATCH: Update partial resource (like changing just the username)
- DELETE: Remove data (like deleting a user account)
HTTP Status Codes You Need to Know
Status codes tell clients what happened with their request:
- 200 OK: Request successful
- 201 Created: Resource created successfully
- 400 Bad Request: Client sent invalid data
- 401 Unauthorized: Authentication required
- 404 Not Found: Resource doesn't exist
- 500 Internal Server Error: Server encountered an error
Building Our Complete Authentication System
Let's create a real authentication system step by step. We'll start with a complete signup route and build from there.
Understanding Routes and Endpoints
A route is a path that defines how an application responds to client requests. An endpoint is the specific URL where an API can be accessed.
// Route: /api/auth
// Endpoints: /api/auth/signup, /api/auth/login
Dynamic endpoints use parameters:
// /api/users/:id - where :id can be any value
app.get("/api/users/:id", (req, res) => {
  const userId = req.params.id; // Access the dynamic parameter
  res.json({ userId });
});
API Versioning Best Practices
Always version your APIs to maintain backward compatibility:
// Version 1
app.use("/api/v1/auth", authRoutes);

// Future Version 2 (when you need breaking changes)
app.use("/api/v2/auth", authRoutesV2);
Setting Up the Main Server
First, let's create our main server file:
// server.js
import express from "express";
import cookieParser from "cookie-parser";
import dotenv from "dotenv";
import helmet from "helmet"; // Security headers
import { connectDB } from "./config/database.js";
import authRoutes from "./routes/auth.routes.js";
import { errorHandler } from "./middleware/error.middleware.js";

dotenv.config();

const app = express();
const PORT = process.env.PORT || 5000;

// Security middleware
app.use(helmet()); // Adds security headers

// Middleware
app.use(express.json()); // Parse JSON request bodies
app.use(cookieParser()); // Parse cookies

// Routes
app.use("/api/v1/auth", authRoutes);

// Error handling middleware (should be last)
app.use(errorHandler);

app.listen(PORT, () => {
  connectDB();
  console.log(`Server is running on PORT ${PORT}`);
});
Creating the Authentication Router
Express routers help organize related routes:
// routes/auth.routes.js
import express from "express";
import {
  signup,
  login,
  logout,
  checkAuth,
} from "../controllers/auth.controller.js";
import { protectRoute } from "../middleware/auth.middleware.js";

const router = express.Router();

router.post("/signup", signup);
router.post("/login", login);
router.post("/logout", logout);
router.get("/check", protectRoute, checkAuth);

export default router;
Understanding Controllers
A controller contains the business logic for handling requests. It's the function that actually processes the request and sends a response.
// controllers/auth.controller.js
import User from "../models/user.model.js";
import bcrypt from "bcryptjs";
import jwt from "jsonwebtoken";

export const signup = async (req, res) => {
  try {
    const { name, username, email, password } = req.body;

    // Basic validation with better error handling
    if (!name || !username || !email || !password) {
      return res.status(400).json({
        message: "All fields are required",
        missingFields: [
          !name && "name",
          !username && "username",
          !email && "email",
          !password && "password",
        ].filter(Boolean),
      });
    }

    // Input sanitization (basic)
    const sanitizedEmail = email.toLowerCase().trim();
    const sanitizedUsername = username.toLowerCase().trim();

    // Email format validation
    const emailRegex = /^[^\s@]+@[^\s@]+\.[^\s@]+$/;
    if (!emailRegex.test(sanitizedEmail)) {
      return res.status(400).json({ message: "Invalid email format" });
    }

    // Check if user already exists
    const existingEmail = await User.findOne({ email: sanitizedEmail });
    if (existingEmail) {
      return res.status(400).json({ message: "Email already exists" });
    }

    const existingUsername = await User.findOne({
      username: sanitizedUsername,
    });
    if (existingUsername) {
      return res.status(400).json({ message: "Username already exists" });
    }

    // Enhanced password validation
    if (password.length < 6) {
      return res.status(400).json({
        message: "Password must be at least 6 characters",
        requirements: [
          "Minimum 6 characters",
          "Consider using special characters",
        ],
      });
    }

    // Hash password
    const salt = await bcrypt.genSalt(10);
    const hashedPassword = await bcrypt.hash(password, salt);

    // Create user
    const user = new User({
      name: name.trim(),
      email: sanitizedEmail,
      password: hashedPassword,
      username: sanitizedUsername,
    });

    await user.save();

    // Generate JWT token
    const token = jwt.sign({ userId: user._id }, process.env.JWT_SECRET, {
      expiresIn: "3d",
    });

    // Set secure cookie
    res.cookie("jwt-scribble", token, {
      httpOnly: true, // Prevent XSS attacks
      maxAge: 3 * 24 * 60 * 60 * 1000, // 3 days
      sameSite: "strict", // Prevent CSRF attacks
      secure: process.env.NODE_ENV === "production", // HTTPS in production
    });

    res.status(201).json({
      message: "User registered successfully",
      user: {
        id: user._id,
        name: user.name,
        username: user.username,
        email: user.email,
      },
    });
  } catch (error) {
    console.log("Error in signup controller:", error.message);
    res.status(500).json({ message: "Internal server error" });
  }
};

// Complete login controller
export const login = async (req, res) => {
  // try creating yourself, thats the best way to learn 😊
};
Security Deep Dive: bcryptjs and JWT
bcryptjs is a library for hashing passwords. Never store plain text passwords – always hash them:
// Hashing process
const salt = await bcrypt.genSalt(10); // Generate random salt
const hashedPassword = await bcrypt.hash(password, salt); // Hash password with salt
// Verification process (for login)
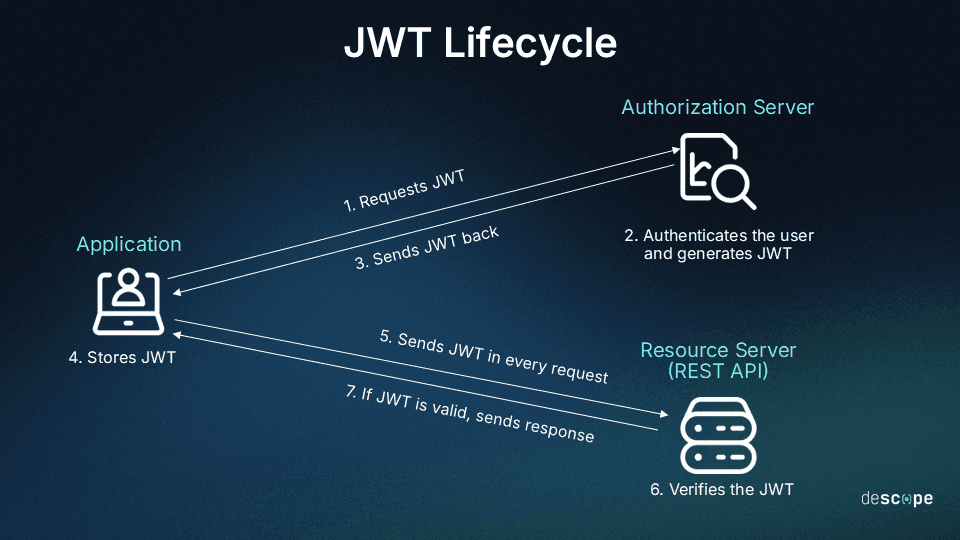
const isValidPassword = await bcrypt.compare(plainPassword, hashedPassword);JWT (JSON Web Tokens) provides stateless authentication. Without JWT, servers would need to store session data for every user, which doesn't scale well.
Cookies store the JWT securely in the browser:
httpOnly: Prevents JavaScript access (XSS protection)sameSite: Prevents cross-site request forgerysecure: Ensures HTTPS-only transmission in production

Database Integration with MongoDB
MongoDB is a NoSQL database that stores data as documents (similar to JSON objects). It's flexible and scales horizontally.
SQL vs NoSQL: SQL databases use tables and relationships, while NoSQL databases like MongoDB use collections and documents. MongoDB is often easier for beginners and works well with JavaScript.
Connecting to MongoDB
// config/database.js
import mongoose from "mongoose";

export const connectDB = async () => {
  try {
    const conn = await mongoose.connect(process.env.MONGO_URI);
    console.log(`MongoDB connected: ${conn.connection.host}`);
  } catch (error) {
    console.error(`Error connecting to MongoDB: ${error.message}`);
    process.exit(1);
  }
};
Environment Variables and .env Files
process.env accesses environment variables – configuration values that change between environments (development, production, etc.).
Environment Setup Best Practice: Create separate .env files for different environments:
# .env (development)
MONGO_URI=mongodb://localhost:27017/mern-auth
JWT_SECRET=your-super-secret-key-here-min-32-chars
NODE_ENV=development
PORT=5000
# .env.production (production)
MONGO_URI=mongodb+srv://username:password@cluster.mongodb.net/app
JWT_SECRET=super-complex-production-secret-key
NODE_ENV=production
PORT=3000
Always use strong, randomly generated JWT secrets in production. Never commit .env files to version control! Add them to .gitignore.
Creating the User Model
Now that we're connected to MongoDB, we need to define the structure of our data. MongoDB is schemaless, but Mongoose (our ODM - Object Document Mapper) helps us enforce structure and validation. Think of a model as a blueprint that tells MongoDB:
- What fields our users will have
- What data types are allowed
- Which fields are required
- Any validation rules
// models/user.model.js
import mongoose from "mongoose";

const userSchema = new mongoose.Schema(
  {
    name: {
      type: String,
      required: true,
    },
    username: {
      type: String,
      required: true,
      unique: true,
    },
    email: {
      type: String,
      required: true,
      unique: true,
    },
    password: {
      type: String,
      required: true,
    },
  },
  { timestamps: true } // Adds createdAt and updatedAt
);

const User = mongoose.model("User", userSchema);

export default User;
Understanding Middleware
Middleware functions execute during the request-response cycle. They can modify requests, responses, or terminate the cycle.

We've already been using middleware:
app.use(express.json()); // Parses JSON request bodies
app.use(cookieParser()); // Parses cookies from requests
Custom Authentication Middleware
// middleware/auth.middleware.js
import jwt from "jsonwebtoken";
import User from "../models/user.model.js";

export const protectRoute = async (req, res, next) => {
  try {
    const token = req.cookies["jwt-scribble"];

    if (!token) {
      return res
        .status(401)
        .json({ message: "Unauthorized - No Token Provided" });
    }

    const decoded = jwt.verify(token, process.env.JWT_SECRET);
    if (!decoded) {
      return res.status(401).json({ message: "Unauthorized - Invalid Token" });
    }

    const user = await User.findById(decoded.userId).select("-password");

    if (!user) {
      return res.status(401).json({ message: "User not found" });
    }

    req.user = user; // Add user to request object
    next(); // Continue to next middleware/controller
  } catch (error) {
    console.log("Error in protectRoute middleware:", error.message);
    res.status(500).json({ message: "Internal server error" });
  }
};
This middleware validates JWT tokens and adds user information to the request object for protected routes.
Testing with Postman
Now that we've built our complete authentication system, it's time to test if everything works correctly. Testing APIs is crucial because it helps us verify that our endpoints handle requests properly, return correct responses, and catch any bugs before users encounter them.
Postman is a popular API testing tool that lets us send HTTP requests and examine responses without building a frontend. It's like having a direct conversation with your server.
Test your signup endpoint:
- Method: POST
- URL:
http://localhost:5000/api/v1/auth/signup - Body (JSON):
{
  "name": "John Doe",
  "username": "johndoe",
  "email": "john@example.com",
  "password": "password123"
}
You should receive a 201 status with the success message.
What's Next?
Congratulations! You've built a solid foundation for any web application. The beauty of this structure is its reusability – once you understand user registration, you can easily implement features like:
Authentication Features:
- User login with password verification
- Password reset functionality
- Email verification
- Profile updates
Business Logic Examples:
- Notes App: Save, update, and delete user notes
- E-commerce: Product management, order processing
- Social Media: Posts, comments, likes, followers
- Project Management: Tasks, teams, deadlines
The pattern remains the same: create routes, controllers, models, and middleware as needed. Sure, here’s a shorter version that keeps all key points:
From Backend to Full-Stack: What’s Next?
You’ve built a solid authentication backend with secure password hashing, JWT handling, and database integration – real, production-ready code.
Now, it’s time to bring it to life with a frontend. In Part 2, we’ll build a React interface that connects to your Express server, managing user state, form handling, protected routes, loading states, and errors.
The full potential shines when backend and frontend work together to create seamless, interactive apps.
Ready to level up? Continue to Part 2: From Backend to Full Stack.


